

SKILL LEVEL: BEGINNER

SUPPLIES
1. Nail polish remover with cotton balls and cotton swabs
2. 4 color coordinating polishes and a white nail polish
3. 2-3 Toothpicks
4. A small piece of tinfoil(not pictured)
5. A base coat(optional, but recommended)
6. A top coat
7. Nail clippers and a file(not needed if your nails are already clipped and shaped)
8. Cuticle cream(optional but recommended)
And now we get down to business! Start off by removing any old nail polish, and then clip and shape you're nails to the desired shape. Then, add on a base coat to protect your nail from any staining that the nail polish may cause.
Next, paint you're ring finger white, and the rest of you're nails whichever color you chose, there doesn't need to be a pattern. You may need to paint on a few coats to get everything opaque. This is what I came up with! Wait 15 or so minutes for everything to dry.
This next step is where it gets a little tricky, especially if you aren't used to doing nail art, but it's totally ok if you mess up, because you can always start over! Also, a little trick, if you keep both of your hands rested on the table(or wherever you may be painting) it'll be much easier to control where your hand goes. So what you want to do first is pick out the base color for your Easter egg. I chose the shimmery pink that's on my pointer finger. Then, take your color and using your brush pour out a SMALL little puddle onto the tinfoil. Once you pour out nail polish, it doesn't go back in the bottle so make sure to use a small amount so you don't waste any.
After you pour out the nail polish onto the tinfoil, take a toothpick, dip it in the nail polish, and then SLOWLY create and oval on your ring finger. The easiest way to do this for me is to just make a bunch of dots and then connect them, but whatever works for you best, do that! 
And then just fill in your oval shape using the same color and motion. Wait 15 minutes to dry.
After this, pick out another color that will match the base color you have chosen. I chose the blue that's on my thumb. Pour a little bit of the blue onto the tinfoil, and using the toothpick, slowly paint a few stripes onto your egg! I don't have much room, as I keep my nails pretty short, but I was able to paint three stripes on both of my ring fingers. Wait 15 minutes to dry
Lastly, take the white nail polish, pour some onto the tinfoil and make three or so dots onto the blue stripes using you're toothpick. Easy peasy! Wait 15 minutes to dry.
Congratulations, you finished the egg! Except that you aren't done just yet. Did you mess up at all during this tutorial? If the answer is no, then good for you, you're perfect, if the answer is yes, than there's and easy fix! I do this every time I finish my nails. Take you're nail polish remover, carefully pour some into the cap, take a Q-Tip, dip it in and then wipe away! If you spilled any polish on you're cuticles, it will easily come off. 
Now for some of you girls who don't know, acetone is a main ingredient in most nail polish removers. There isn't anything wrong with acetone, except that it dries out cuticle skin sooooooo easily! Which is why I put the Burts Bees cuticle cream on my cuticles at the end of every manicure. I love this stuff sooo much! It mosturizes my cuticles and it smells amazing! I highly recommend it! Here's what it looks like.
And last but not least, it's time for the top coat! This is extremely important to every manicure as it will prolong the life of your nails with minimum chipping. Make sure you wait at least 20 minutes before applying the top coat to prevent smudging! 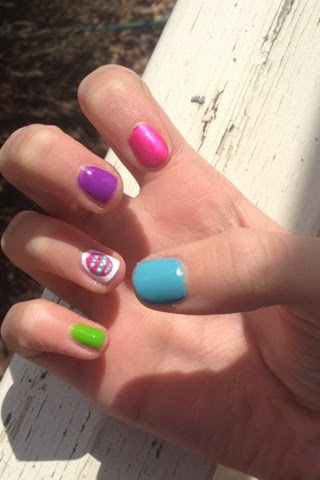 And there you have it! A cute, springy, Easter inspired nail art design that is sure to get compliments. Please leave a comment telling me if you want more nail tutorials, and if you like this one! Also, I would looooove to see any recreations you ladies come up with. Have a great day and remember to smile:)
No comments:
Post a Comment